Changing Client Ownership
Work in a multi-Loan Officer Whiteboard environment where individuals specialize in certain mortgage types or pipeline sequences like “New Construction” or “Credit Repair”, but you don’t have a way to transfer the client to them? Well, fret no more because we have an answer called, “Change Ownership”!
Change Ownership:
What is it?: Change ownership allows users with proper permissions to transfer a client record to another team within the same Whiteboard Office.
Purpose: Change Ownership came about after multiple Whiteboard users requested the ability to transfer a client and respective mortgage(s) to a specialist within their Whiteboard office. Previously, this was a manual and tedious process.
What are the requirements?
Teams: You must have multiple teams under one Whiteboard Office for Change Ownership to work.
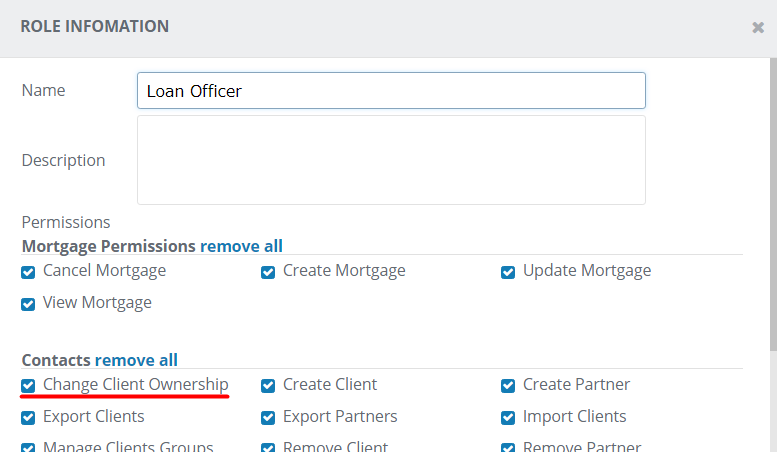
Roles: Each team that requires this feature must have a Role that supports Change Ownership.
Only users assigned to the role will have this feature available to them in Whiteboard. Best practices will prefer that only the Loan Officer (or like role) should have this permission (set by default for the role).
Screenshot of Permission: (Reference only)
Groups: A Group is not necessarily required, but best practices prefer that a group is created for each team where leads will be transferred to. The primary reasons for creating a group to transfer a client to, is so that you can create a campaign to notify the recipient of the newly transferred client to their team and easily track transferred clients from an easily accessible group view.
Groups are created and managed from either primary contact views, which available under “Manage Groups”.
Campaign: While not a true requirement, best practice standards suggest a campaign to be implemented so that it can notify the recipient of the newly transferred client. Using a campaign will help prevent the transferred client from slipping thru the cracks. Campaigns will trigger off the group name you created.
However, you may rely on Whiteboard’s built-in Notifications system to supply you with the emailed noticed of the new transfer as well.
How does it work?
Change Ownership:
Step 1: Once your teams have been properly configured, a new feature will appear on client records called “Change Ownership”. This option is in the upper-right corner of a client record. Team members with permissions can click on the link to begin the transfer process.
Step 2: Select the “Destination Team” and then the team’s default “Group” for transferred clients, when applicable.

Step 3: Select “Change” and Whiteboard takes care of the rest!
A Whiteboard Notification email is automatically sent to recipient team members. See above screenshot from the Campaigns section.